Shutter speed and Exposure

Want to learn how to get light trails and other cool effects like above? or just want to learn more about manual settings on a camera? Take a Read!

Winter Lights 4:52

Week 4 In the weekly photo challenge; Winter Lights!

Development Shoot - Sharpness and composition

After my Windkarting shoot in the Summer, I went out to develop the skills I felt I was lacking in, and I chose sharpness and composition

Rule of Thirds

The Rule of Thirds technique, adds tension and dramatization to any photo! A must know for the aspiring and the experienced photographer alike!

Autumn Angles

Autumn is a beautiful time of year, Take advantage of it!

Friday 28 September 2012

Strangers 4,5 and 6 - The Family


So back onto the my 100 Strangers project, which is tremendously lagging, I manged to get this lovely photo, of this young family enjoying themselves, after asking, of course, and they very generously let me take some photos! In my classes recently, we have particularly been focusing in on emotion, and I need to work more on showing it in my portraits, so this was an amazing opportunity to get some practice!

The editing consisted of curves and contrast editing, and that was it this time!

I'd like to thanks the family very much for letting me to take a photograph, It is much appreciated!

Wednesday 19 September 2012

Development Shoot - Sharpness and composition

Hello!
After my Windkarting shoot in the Summer, I went out on a shoot to develop the skills I felt I was lacking in, and I chose sharpness and composition for this development shoot. As my shot was taken at night, I used longer shutter speeds so the photos were properly exposed, and I made use of very slow apertures, (I used f/22 for most photos on this shoot)to keep the photo sharp, and make sure everything was in focus. Here are my final pieces after editing.

F/22 10 seconds ISO100

HDR photo, combining F/3.5 1/5 Second ISO 100 and F/22 30 Seconds ISO 100

Another  HDR photo, combining F/3.5 1/5 Second ISO 100 and F/22 30 Seconds ISO 100

Because it was a windy night, and I was using long exposure times, I used two photos, one long exposure photo, and one short exposure photo, and I then merged them, so I retained the sharpness of a fast shutter speed, while achieving effects only achievable by longer shutter speeds.

Thanks for looking, and feel free to knock some feedback down below! 


Monday 6 August 2012

Freelance photographer arrested on assignment.

A Freelance photographer, who was doing an assignment at the time for The New York Times has been arrested while he was on an assignment with two reporters, who at the time were in the progress of doing street interviews.
          The photographer, a Mr Robert Stolarik, who has worked in photojournalism for 15 years now was taking photos of a teenage girl who was being placed under arrest, at arround 10:30pm, until a police officer asked him to stop. The photographer identified himself as a photographer for The Times and continued to take photos. Then a second officer appeared, grabbed his camera and "Slammed" it into his face, Stolarik said. Stolarik then said he asked for the officer's badge numbers, then the officers took his cameras, and dragged him to the ground. He then stated he was kicked in the back, and stated he received bruises and scrapes to his arms, legs, and face.
            The statement issued by the police department said that the officers were trying to disperse the crowd, after giving “numerous lawful orders” to everyone in the crowd, including Stolarik. Then Stolarik apparently tried to push forward "inadvertently" striking an officer in the face with his camera. After this, the statement said Stolarik "violently resisted being handcuffed" and because of this, an officer was cut on the hand. As this was happening, one of the reporters with Stolarik got a video of him face down on the ground with 6 officers around him.
           After the incident, Stolarik was taken to the 44th Precinct station and was released at 4:40am. He then checked himself into New York-Presbyterian Hospital/Weill Cornell Medical Center for X-rays., where he was let out with no broken bones, or any internal bleeding. 
          “It’s the most uncomfortable I've ever been as a journalist and I’ve had a gun to my head" “All of your rights can be take away instantly.” said the 35 year old photographer.
           Keith Bedford, a reporter for The New York Times was one of the reporters near Stolarik at the time of the incident. He said that even before Stolarik was arrested, police pushed him and shoved him to the ground“They forced us off the sidewalk, hit us with nightsticks—shoving them into our chests,” the freelancer said.

 “This is an incident where it seemed the photographer was doing his job taking photographs, and the police overacted and attempted to intimidate him and block him, leading to his arrest,” Mr. Freeman said. Stolarik is scheduled to appear in court this November.

              Now, is this a case of an arrogant photographer pushing his luck trying to get a good shot, or is this a case of big headed policemen trying to intimidate Stolarik? I'm unsure. I'll try and keep you updated when this goes to court!

Monday 30 July 2012

Wind Karting

Hello Everyone! Back today with a post of some shots I took on a day down to Weston-Super-Mare, a seaside town, where sports involving wind such as kite surfing, wind karting, wind sailing and just kite flying are big attractions! I got the chance to photograph some real talented Wind Carters while I was there, and here's the shots I got;


Very proud of this one, I like the angle, and where the light is in this photo!

This one uses the panning technique, a technique I'll be giving a full tutorial on for my next post!

Another panning shot here, like this one more than the one above, as it looks crisp, and brighter!

more panning....

and more panning.......

This fella twisted his kite, but as he got it back flying, it lifted him off the ground a little!  I like this one, and if you look in the background, you can see a kite surfer! I like the composition of this one, but it was more luck than judgement I think! 

Nice bright shot here, very contrasty! (According to my spell check,"vontrasty" is actually a word!

Used a clone stamp tool, to get rid of a kit that was in the way of this shot, and I think it was effective! I'll have to write a tutorial on how to use the clone stamp at some point, but I don't know when! I'll keep you updated on when I plan that one!

Another one I  really like, because of the lighting, I thought the lighting made this shot very effective!

Bit of a plain image IMHO, however this man's kart was VERY fast!

Second image, taken seconds after the above image.


So there are some of the shots I got at Weston, I have some more of the wind surfers and kite surfers, so I'll post em' when I can get round to em'! You might also notice the new watermark, I've started putting these on images from now outwards, as I was told by a fellow photographer, who runs a blog similar to mine got ALL of his pictures copied and sold on print through a website without his permission! He advised me to watermark my images, and here's the first set with them on, what do you think? Does it look good? Bad? Do you like the photos? or maybe not, whatever you think, comment down below, and until next time, Happy Photographing!

Thursday 26 July 2012

Stranger 3 - The Photographer


Now this was a really fun mini-shoot, I saw this guy waiting outside a store as I was crossing a road, and I asked a friend of mine (Holding the guitars in the background) to wait for me, and ran back to ask him if I could get a few photos, I explained my project, and he gave me the go ahead! I asked him about his photography, he said he was part time photographer, and hobbyist! He was also in town to take photos of the City's harbour festival, and he was really great to talk to! He nudged me in the right direction about background, and he was an all round friendly guy! He also gave me one VERY important tip. ALWAYS enjoy it. Don't do photography and miss the enjoyment, because then it means nothing!


Here's my portrait version, and you can see my friend in the background again!

I like these photos actually, I had to turn up contrast fairly high (about 15+ by photoshop's scale) as the sky blended with the man's hair a little, and it still does, but it's relatively fixed! Because of the contrast increase, brightness went up a little as well, and I increased the saturation for a little more "pop" in the photo. The landscape needed some more background blur as the scene was distracting, but I like the outcome!


Thanks for reading, and until next time, Happy photographing!

Stranger 1 + Stranger 2 - Children


Not a spectacular one, but I was trying to be fast as it was really nice of the parent to allow me to take a photo or two, These two were in town for the harbour festival that our city has once a year, and I saw these two looking over, and I asked their mother if she minded me taking a photo, she said go ahead, so I took this. It's boring, it's bad, but it's a start! My signature bokeh edit with some colour correction was the only editing used here!

Wednesday 25 July 2012

100 Strangers - The Start

So, I've decided to set myself a new project, and that project is to take portraits (hopefully good ones) of 100 people in a year. I want most of them, (like, 98%) to be of strangers, and any good ones of friends I might include too!  I've already got a start, I have 3 people, 2 young children, and a photographer! This post is just to mark the start, keep your eyes open for posts on this project!

P.S;   If you live in the Bristol (UK) area, and would like a few outdoor portraits done for me to use on this project, and for you to keep, contact me on ryanfrankcom@gmail.com, and I'll be happy to do them for free!

Also, you may have notice our adverts have disappeared. I was all ready to buy a shiny new lens with the profits of the blog, and then google has a paddy. Not pleased.

Happy photographing, and until next time!

Tuesday 17 July 2012

Photographic Firsts


Photography may be a bit older than you thought! With a winding history, spanning almost 200 years, hundreds of milestones, and millions of photographers, none of it could have been possible without a Mr Joseph Nicéphore Niépce.


First permanent photograph - "View from the Window at Le Gras"

This French inventor is credited with having taken the first EVER permanent photograph, in 1826. His earliest surviving photograph (possibly even his first) called "View from the Window at Le Gras" 


File:View from the Window at Le Gras, Joseph Nicéphore Niépce.jpg
View from the Window at Le Gras -  Joseph Nicéphore Niépce 
What you see above is the photo that started it all off. One of the first permanent photos ever. I'd call that an achievement!  with millions of photographs taken everyday, by professionals, or by a kid with his phone, this was one of the very first photo to have been taken.  The basics of how the photo was made involve using a polished pewter plate, and Bitumen, (from petroleum). When Bitumen is exposed to light, it hardens, so after exposing the bitumen to light for a long while, the unhardened bitumen can be washed away leaving some light areas, and some dark areas, creating an image.

First photograph of people - "Boulevard du Temple"

A partner of Joseph Nicéphore Niépce's, Louis Daguerre, took the first photograph of people ever. your profile photo? Easy, get your phone out of your pocket, look in a mirror, snap, you're done, Mr Daguerre spent many years refining the bitumen technique, and eventually used it to take the picture bellow! 

File:Boulevard du Temple by Daguerre.jpg

Boulevard du Temple by Louis Daguerre


This photo took 10 minutes to expose, and in the bottom left corner, by the road, you can see a man getting his shoes shined. Because the traffic was moving, the exposure was too long to capture it, but these two men, were there long enough to be the first two photographed men! This photo was taken in late 1938 or early 1939.

First colour photograph - "Tartan Ribbon"


Colour photography was explored throught the 19th century, but were relatively unsuccessful, as only temporary images could be made, and the techniques used were not sensitive to  red or green light unill the 1870s!
File:Tartan Ribbon.jpg
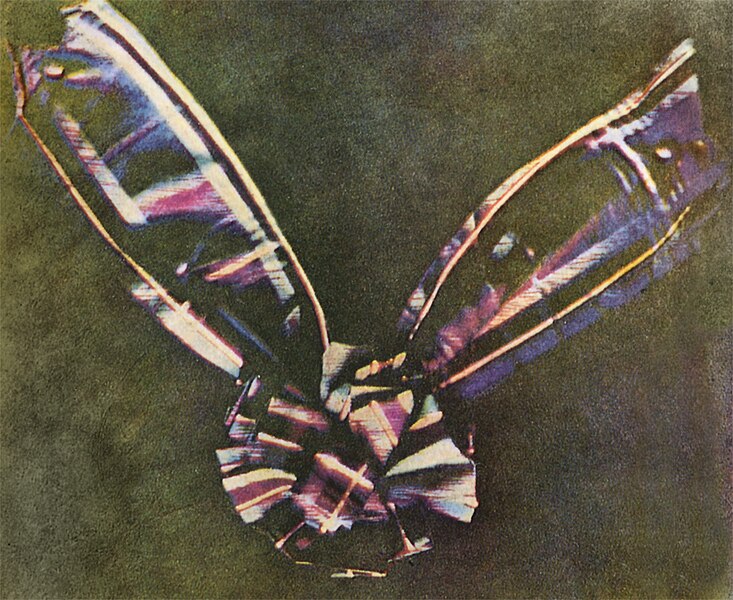
Tartan Ribbon - Thomas Sutton
The first colour photo was taken in 1861, by (you guessed it) a Scottish physicist named James Clerk.Maxwell.

First CCD sensor (Start of digital photography)

In 1969, the charge-coupled device was invented in AT&T Bell Labs by Willard Boyle and George E Smith. The lab was at the time, working on semiconductor bubble memory, when it occured to Boyle and Smith that the "device could be used as a shift register and as a linear and area imaging device"

File:Nobel Prize 2009-Press Conference KVA-19.jpg
Boyle and Smith at the 2009 Nobel prize press conference
I can't explain how it works very well so sourced from my friend Wikipedia: "The first working CCD made with integrated circuit technology was a simple 8-bit shift register. This device had input and output circuits and was used to demonstrate its use as a shift register and as a crude eight pixel linear imaging device. " 
As you know, these 8 pixels, are now rather basic compared to our 80000000 pixel medium format camera!

First photo uploaded to the Internet

Les Horribles Cernettes -First photo on the internet
Yeah, I know I thought it'd be a cooler photo too. The CERN house band, "Les Horribles Cernettes" were fortunate enough to have this beautiful image of them all uploaded to what today is a huge mass of billions of photos!


First version of Photoshop

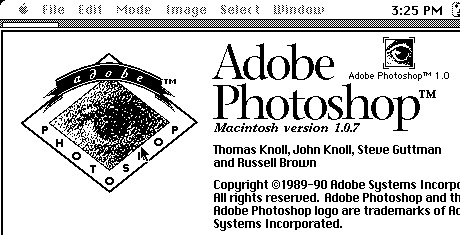
Adobe Photoshop 1.0.7 - First public release

Use photoshop a lot? Me too, but did you ever think about it having no layers or auto edits? Nope. Me neither, but that is EXACTLY what the first version of photoshop could do, it lacked layers, filters, adjustments, and more, stuff, that if you use photoshop, you can't live without! it was released to the public in 1990, and photo editing changed forever
First Camera Phone
The first camera phone was released by J-Phone in japan in 2001. The J-SH04 was made by sharp and packed a magnificent 0.11 megapixels!

J-SH04 - First camera phone
It was a CCD camera, and brought a whole new game to mobiles, it changed your world forever. now we can take out our phones, and pop, 8MP photos to share on Facebook.


Well that's all from me tonight! There's a whole wealth of information out there, and the history of photography is huge, I've just touched upon some of my favourite firsts, I might do another in the summer!
Thanks for reading, and until next time, Happy Photographing!

Monday 18 June 2012

Aperture, F-Stops and Depth of Field

Hello Again! Today, I have an article on Aperture, to finish the first three major segments in the "Camera Settings" series!

First of all, Aperture is measured in f-stops, shown like this:  f/3.5    f/6.5  f/22 ect.
 The aperture controls the diameter of the lens opening (shown above), the higher the number, the smaller the opening. This controls how much light is let in through the lens, and onto the sensor of the camera, so a smaller number (or a "faster aperture" as it is sometimes called) like f/2.8 will mean there is a very big opening on the lens, this lets in a lot of light you have to compensate for this by lowering your ISO or Shutter speed, and a bigger number (or "slower aperture") like f/24 will mean there is a very small opening, so very little light will be let onto the sensor, and you will need to use a higher shutter speed or ISO.


Here's my aperture scale, showing how aperture effects light in your photo!All photos are at an ISO of 200 a Shutter speed of 1/10th, the aperture is underneath each photo
f/3.5

f/6.3
f/11
f/18
f/22


As you can see, when getting to slower apertures, the photo becomes very dark, and you can barely see anything, so use your ISO and Shutter speed accordingly, so the photo is better exposed.

Another thing the aperture affects is the depth of field, or the DOF as it is sometimes known. The depth of field is how much of a photo if in focus, and how much is out of focus. If you can see every thing in focus, then there is a very large depth of field, if the photo has a lot of background blur, and only a small part of the photo is in focus, than there is a very shallow depth of field.

Here's a depth of field to aperture comparison, I've changed the shutter speed on all of them though, so you can see the photo clearly. ISO on all of them are at 200.

Aperture - f/5.6  Shutter Speed -1/15

Aperture - f/16  Shutter Speed - 1/2 

Aperture - f/22  Shutter speed - 2/1


As you can see, the higher the aperture, the shallower the depth of field. If you want to get a lot of background blur, use a fast aperture! Another tip for lots of background blur, is zoom in, it will give more blur! (I don't know why, but that's what happens!)


So there you go, The big three, Aperture, ISO, and Shutter Speed all covered! I'll be back with more camera settings and what they do, soon! Thanks for reading, and Happy Photographing!

Thursday 14 June 2012

ISO Setting/Film Speed

Hello! Today I'm going to talk about ISO, as it is known on digital cameras, or film speed, what it used to be called back in the days of 35mm film cameras. Hopefully after this article you can control your camera a little more manually, and take the next step in mastering your tool of work!

ISO or film speed is practically the sensitivity of your sensor or film to the light. The higher your ISO, the more sensitive the sensor or the film will be to light! On a digital camera, you can change this setting quite easily by going through the menus (find exactly how too in your specific camera manual), however on a film camera, the film speed is on the film you buy, so if you buy ISO 400 film, you've got a Film Speed of 400 until you switch to a new roll of film, with a different ISO.

ISO numbers go up in a rather standard order, starting with the lowest number, the ISO setting that gives the lowest sensitivity to light, here is a typical scale; 100, 200, 400, 800, 1600, 3200, 6400.  This scale is the most common, but you can get odd numbers, the main thing to remember is 100 gives a very low sensitivity to light, 6400 would give you a very high sensitivity to light. These numbers, on more modern, higher end cameras have been extended, like the new Nikon D4, the peak of tech at the moment, has an expandable ISO of 50-204,800.  That is one crazy range, and it's only going to get better as technology progresses.

Well if you can change a sensors sensitivity, why can't we use a really high ISO and take photos in the dark, without having to increase our shutter speed? Grain, Or noise as it is known on a digital camera. The higher your ISO, the more grain you will get, for example, look at this shot, taken at 6400 with no noise reduction;
Now this is a particularly bad example of lots of noise, because my camera is known for bad high ISO performance, but if you go to an ISO of 1600 or more, you are going to start noticing image compromising noise, so look out for it when taking a photo.

So, for my conclusion, here is my ISO scale, All these photos were taken at an F-stop of f/5.6 and an exposure time of 1/10th of a second, with the ISO used under each photo.

ISO 100
ISO 200
ISO 400

ISO 800
ISO 1600


So that's all for today, the last tip I can give you, is experiment with your ISO, sometimes, noise/grain is desirable, such as in certain black and white images, or giving an image that "retro" feel.

Anything else you want to know? have any ideas or suggestions? Knock em down below, and as always, Happy photographing!

Sunday 3 June 2012

Smart Cameras - Opening the possibilities

I'm not a huge fan of point and shoots. They are nice and compact, but in my opinion, they are just not cut out for what I need them for, but this new range of Samsung Smart Cameras caught my eye, for more reasons than one, and the main one? Wi-fi capability.

Saturday 12 May 2012

Justin Quinnell - Pinhole Photographer Q+A!

So I walked in to my photography class knowing we would not have our usual teacher, due to exams being overseen, and expected to get a clueless substitute. How wrong I was. I was fortunate enough, to have the great pleasure of meeting, and being taught by Mr Quinnell, for the week!

Tuesday 10 April 2012

New Header!

Recently, a friend told me that the old header looked a lot like an old Microsoft Word art preset, and I couldn't help but see it each time, so here's the new one! What do you think? like it? anything I should change?

Until next time, happy photographing!

Thursday 22 March 2012

A Blur of People 8:52


Hello All!  Today I have week 8's photo, called A Blur of People! Now this shot took a hell of a long time, but I love the outcome, I had the idea while I was walking in town and everyone seemed to be running and not paying much attention, and this came to me, so I set up my tripod behind a sign (to try not to hinder anyone) and set the exposure time to something like just over a second's exposure, (but if you want to do this yourself, 1/30 or slower should work!) and set the aperture as high as possible, and the ISO as low as possible, because  for the blurring to be captured, the exposure time had to be fairly long.

I LOVE the outcome, was really pleased that this worked, what do you think?

Sunday 18 March 2012

Blue skies and Construction 7:52


Here's my week 7 photo, entitled "Blue skies and Construction".

If you look through most of my shots recently, you can really see where I am experimenting with empty space, lighting and Positive and Negative space in photos.  Positive space is the part in the photo that contains the focal point, or the subject, which in this case is the crane, and the Negative space is the sky surrounding the crane. Photographers usually leave large amounts of negative space like this when the photo is for a poster, or magazine cover, as the Negative space can easily be filled with text without covering the focal point.

That week wasn't a very productive one, and I didn't get many shots. the ones I DID get, were crap, so here was the best one from that particular week.

Keep Photographing, and feel free to share your photos that include a lot of negative space below!

Friday 16 March 2012

I'm Back!

I cannot explain how sorry I am for neglecting the blog for so long, but I've been so busy with exams, work and     other miscellaneous problems, I have had little or no time at all to update or check the blog, but guess what? I'm back, and I have several new posts coming, I know it can't make up for what you missed, but I'm back, and I'll be posting regularly again! (If all goes to plan xD)

Friday 10 February 2012

The Eye 6:52


And here is my week 6 piece!  This is a photo of a new office building called The Eye, due to the shape of the building!


Powerlines 5:52


Hello!  And I'm finally back with week 5, and 6 coming up straight after!

Well here we have week 5!

Monday 30 January 2012

Theme Troubles

As you may notice, I'm using a stock theme at the moment, and I haven't uploaded this weeks photo, this is because my theme decided to mess up on me! I'm gutted, I spent hours sorting out the old one, but on the bright side, you can all look forward too TWO weekly photos, and a bright, new theme!  

Sorry for any inconvenience, It's annoying for me too, but I have a lot of exams this week, so I can't fix it till the weekend, let me know if you have any suggestions for changes this weekend! :D

Sunday 22 January 2012

Winter Lights 4:52


So today, we have week 4's photo!  This shot was taken in Aztec West (again), I really like the contrast between the sky and the lantern, with the dark shades giving it a nice winter feel!

To edit this on, I first edited the sharpness, and then adjusted the levels, the contrast and saturation, then afterwards, I added a layer of blur behind the lantern!

Tell me what you think of this weeks photo, and good luck with your photos in the week to come!

Saturday 21 January 2012

Exposure And Shutter Speed


Today's Article is all about Shutter Speeds and Exposures, The first thing you need to know, is that all cameras have a sensor, and the sensor is what the light hits to produce your image, but the light needs to pass through a shutter, and the amount of time a shutter is open, to allow light to hit the sensor for, is called shutter speed, or exposure time!

Monday 16 January 2012

Cogs and Gears 3:52


Time for this weeks photo!        This one was taken just out of the way of Temple Meads train station, I  passed this walking into the town, It looked amazing, the light had hit it perfectly, it looked even better in real life,  but there you go, week three!

Twitter Delicious Facebook Digg Stumbleupon Favorites More